Staff
Creating a staff member
The Staff menu option on the left is where you add staff members. To add a new staff member, select the Staff > Add New option from the left hand WordPress menu. When you create a new staff member, you need to
setup a few more options.
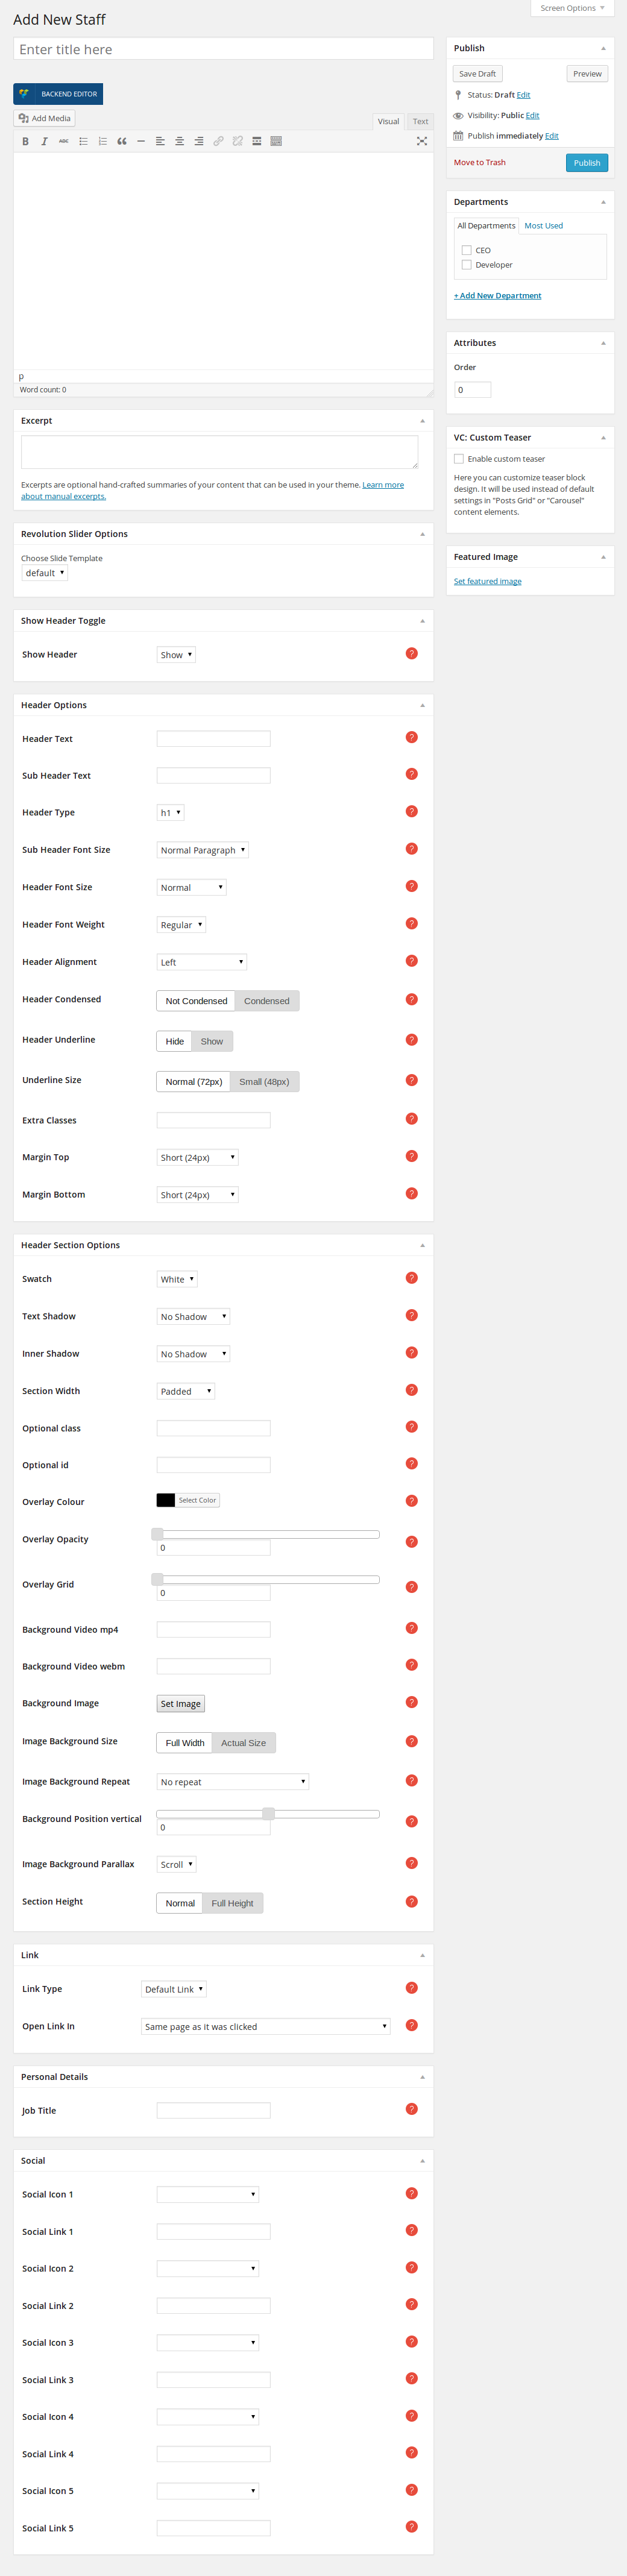
- Title and main content: the title and main content of the Staff Member single page.
- Excerpt: the summary of your staff member's content that will be shown when you add it as content to your pages.
You can find out how to setup the Header Options in the Pages section here.
- Link Type: same as Portfolio Items.
- Job Title: sub header that is shown below the staff members name.
- Personal Moto Title: the cheeky title that pops up when a staff member image is hovered over.
- Personal Moto Text: the cheeky text that pops up when a staff member image is hovered over.
- Social Icon 1: social Network Icon to show for this Staff Member.
- same for the rest of the social icons.
- Departments: staff members can be grouped in departments.
- Feature image: feature image of the staff member.
Link
- Link Type: Your service item can link to a
- Default Link: the single service page.
- Page: a page that you have created.
- Post: a post that you have posted.
- Portfolio: a portfolio item that you have created.
- Category: a category of posts.
- URL: an external URL.
- No Link: the service item is not linkable.
- Open Link In: Where the link will open.
Personal Details
- Job Title: Sub header that is shown below the staff members name.
Social
- Social Icon 1: Social Network Icon to show for this Staff Member.
- Social Link 1: Add the url to the staff members social network here.
Same for all the social icons in this section.
Adding staff members to a page
If you wish to add a staff section to your page, once you have created an empty row, follow these steps
- press the Add element button of the Visual Composer and choose the Staff List element. Now you can edit the staff list
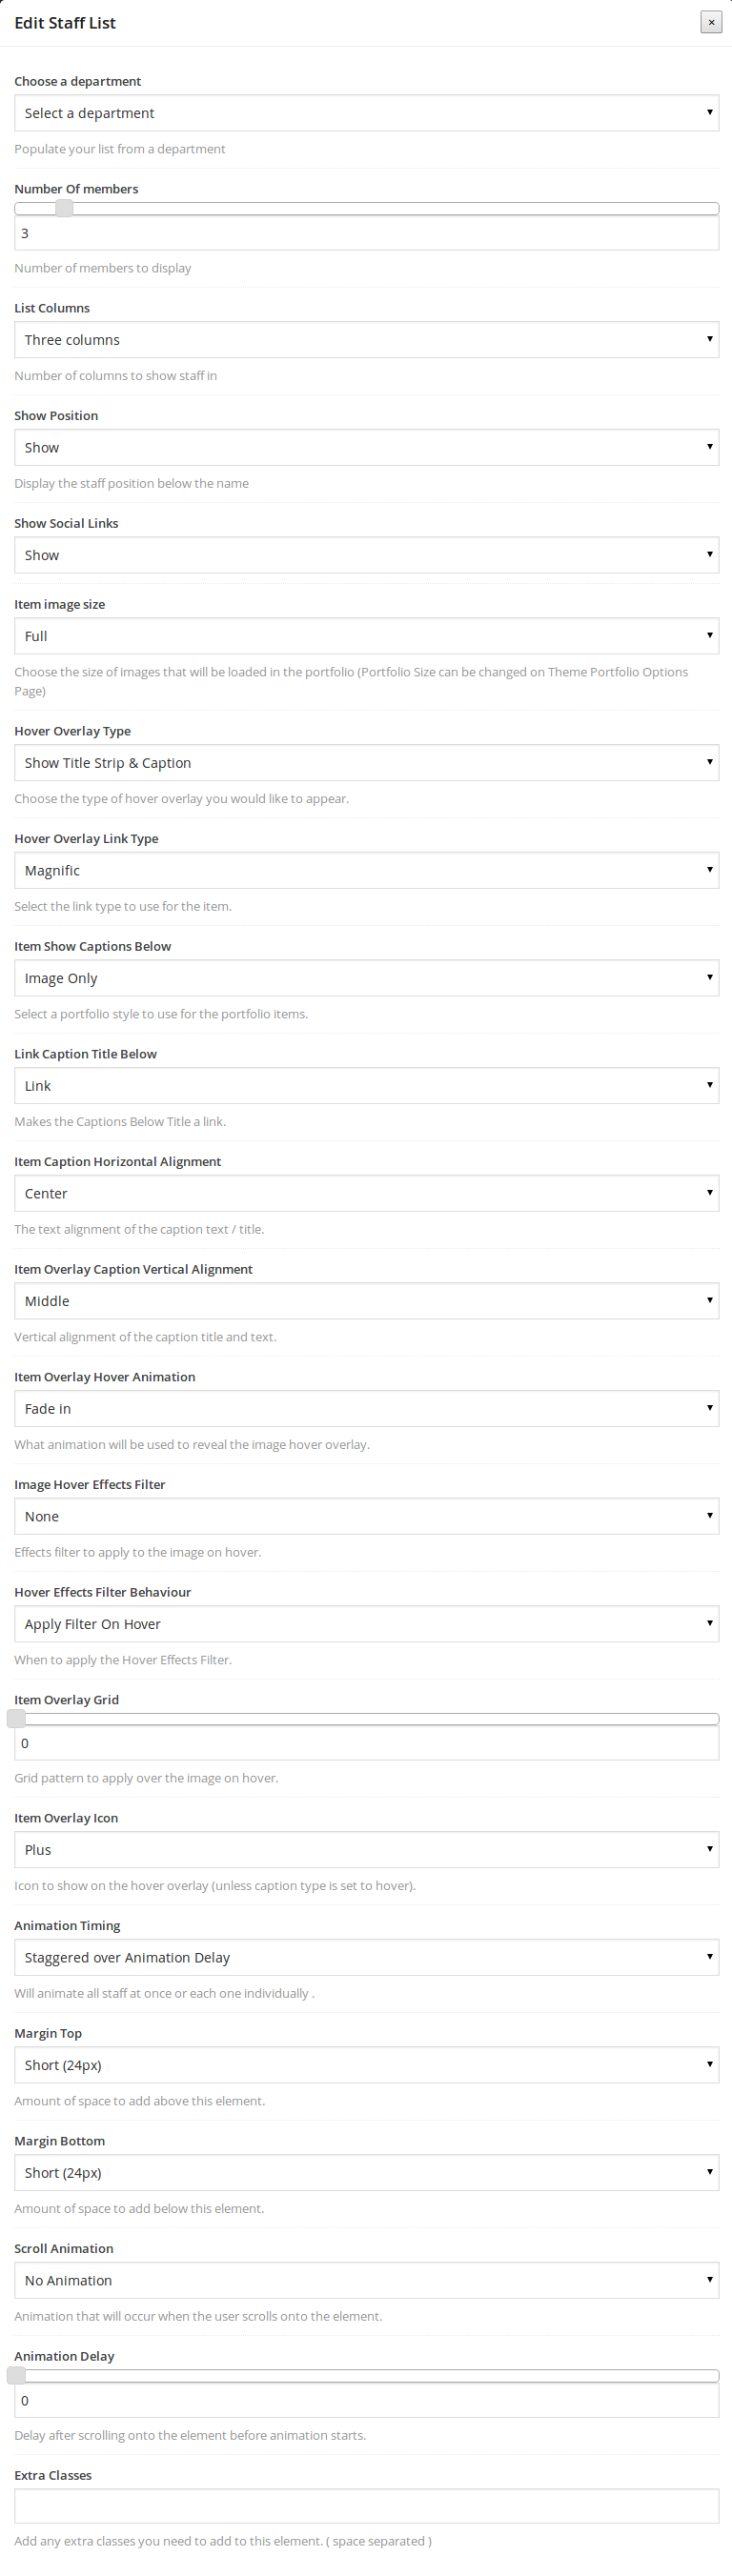
- Choose a department: populate your list from a department.
- Number of members: number of members to display.
- List Columns: number of columns to show staff in.
- Show Position: Display the staff position below the name.
- Shadow: show or hide shadows.
- Image Shape: the shape of the member's image.
- Show Social Links: show or hide the social links.
- Item image size: Choose the size of images that will be loaded in the staff list.
- Hover Overlay Type: Choose the type of hover overlay you would like to appear.
- Hover Overlay Link Type: Select the link type to use for the item.
- Item Show Captions Below: Select a style to use for the staff list items.
- Link Caption Title Below: Makes the Captions Below Title a link.
- Item Caption Horizontal Alignment: The text alignment of the caption text / title.
- Item Overlay Caption Vertical Alignment: Vertical alignment of the caption title and text.
- Item Overlay Hover Animation: What animation will be used to reveal the image hover overlay.
- Image Hover Effects Filter: Effects filter to apply to the image on hover.
- Hover Effects Filter Behaviour: When to apply the Hover Effects Filter.
- Item Overlay Grid: Grid pattern to apply over the image on hover.
- Item Overlay Icon: Icon to show on the hover overlay.
- Animation Timing: Will animate all staff at once or each one individually.
- Margin Top: Amount of space to add above this element.
- Margin Bottom: Amount of space to add below this element.
- Scroll Animation: Animation that will occur when the user scrolls onto the element.
- Animation Delay: Delay after scrolling onto the element before animation starts.
- Extra Classes: Add any extra classes you need to add to this element. ( space separated )
Adding single staff member to a page
If you wish to add a single staff section to your page, once you have created an empty row, follow these steps
- press the Add element button of the Visual Composer and choose the Single Staff element. Now you can edit the Single Staff member
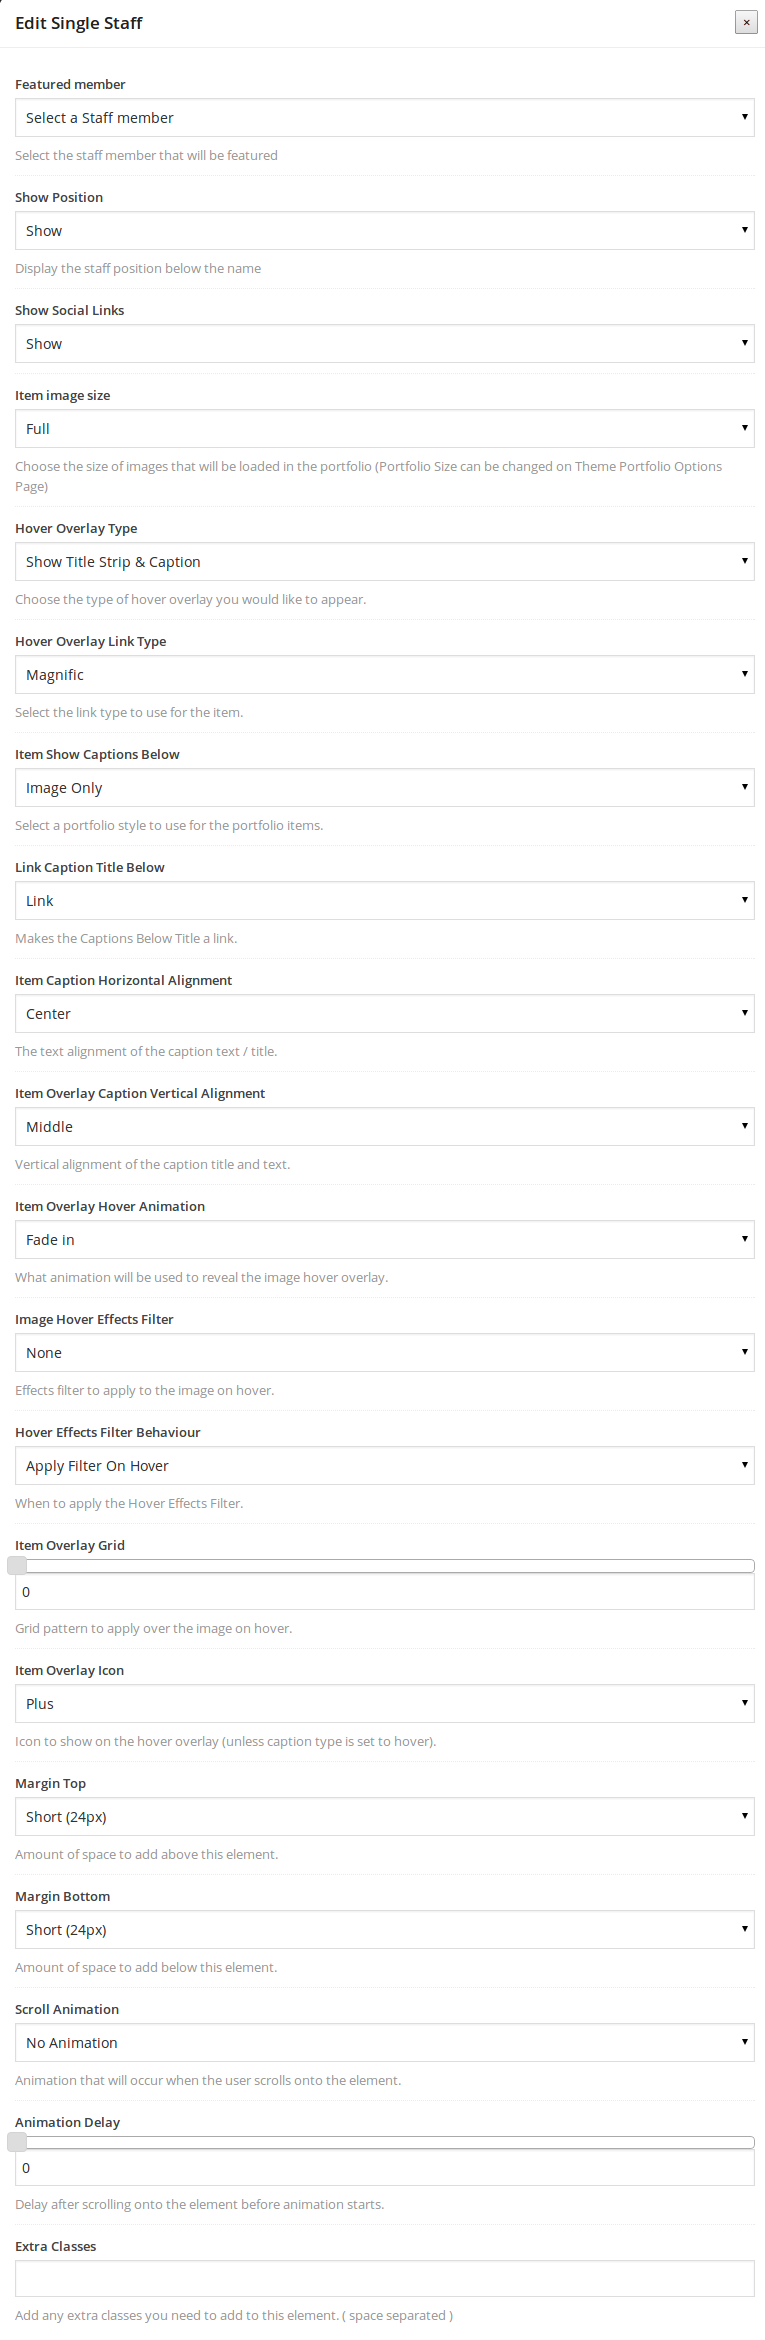
- Featured member: select the staff member that will be featured.
- Show Position: Display the staff position below the name.
- Show Social Links: show or hide the social links.
- Item image size: Choose the size of the image that will be loaded in the single-staff.
- Hover Overlay Type: Choose the type of hover overlay you would like to appear.
- Hover Overlay Link Type: Select the link type to use for the item.
- Item Show Captions Below: Select a style to use for the single-staff item.
- Link Caption Title Below: Makes the Captions Below Title a link.
- Item Caption Horizontal Alignment: The text alignment of the caption text / title.
- Item Overlay Caption Vertical Alignment: Vertical alignment of the caption title and text.
- Item Overlay Hover Animation: What animation will be used to reveal the image hover overlay.
- Image Hover Effects Filter: Effects filter to apply to the image on hover.
- Hover Effects Filter Behaviour: When to apply the Hover Effects Filter.
- Item Overlay Grid: Grid pattern to apply over the image on hover.
- Item Overlay Icon: Icon to show on the hover overlay.
- Margin Top: Amount of space to add above this element.
- Margin Bottom: Amount of space to add below this element.
- Scroll Animation: Animation that will occur when the user scrolls onto the element.
- Animation Delay: Delay after scrolling onto the element before animation starts.
- Extra Classes: Add any extra classes you need to add to this element. ( space separated )
Staff List Shortcode
If you want to add to your content a staff members list, this is the shortcode that you want.
- Pick the department that you want to show staff members from.
- Select the number of the staff members you want to show.
- Select the number of columns that you wish to show them by.
- Decide whether you want to show the position and the social links for each of the staff members.
- Set the size of the image.
- Decide on the type of overlay when hovering on the items.
- If you want only an icon, pick the Show Icon option and set it some options later in Item Overlay Icon.
- Pick Show Title & Caption if you want the title and the captions of the staff member. Remember, the captions are the Excerpt metabox that you fill in with text when you edit each staff member(go
hereto read more about how to add a staff member).
- Pick Show Title Strip & Caption if you would like the title to be always visible, and the captions to show smoothly on hover.
- Pick No Hover Overlay if you would not like to have an overlay effect on hover.
- Pick the type of the hover ovelay link. The first choice is Magnific, which will open a magnific popup of your staff member image. The second choice is Link, which will link the item to whatever
is set to be the target when editing each staff member(go here to read more about how to add a staff member). The third choice is No Link, when you do
not want the items to be linkable.
- Decide if you want your captions to be visible only when hovering on the image of each staff member, or always under the image.
- Make the captions linkable the same way as in step 7.
- Align your captions vertically and horizontally.
- Pick the type of the hover animation and the hover effects filter that you want. Also, decide on when you want the effect to take place.
- Set the grid pattern to be applied when hovering on the image and the overlay icon, if you have chosen Show Icon on step 6.
- Set the animation to take place simultaneously for all the staff members or with a staggering effect, if a Scroll Animation is set in the global options to follow.
- Set the global options as described here.
Single Staff Shortcode
If you want to add a single staff member view anywhere in your page, this is the shortcode that you want. It follows the same procedure as the Staff List shortcode above, the only differnce being that instead of
picking a category, you pick a single staff member.